In large-scale commercial real estate and multi-family residential projects, the durability of interior finishes is directly linked to the precision of their installation. Among the various resilient flooring options, luxury vinyl tile (LVT) and solid polymer core (SPC) products offer distinct performance advantages, including dimensional stability, moisture resistance, and high acoustic performance. However, these benefits are only realized when the installation process adheres to precise engineering standards.
For contract managers, understanding the intricacies of installing vinyl plank flooring is important to prevent premature system failure, joint separation, or subfloor telegraphing. This manual details the systematic requirements, diagnostic procedures, and installation methods necessary to achieve a durable, structurally sound result on commercial jobsites.

Subfloor Assessment and Preparation Standards
The structural integrity of a resilient floor is completely dependent on the quality of the substrate beneath it. Any deviation in the flatness, moisture level, or cleanliness of the subfloor will eventually manifest on the surface as telegraphing, joint breakage, or adhesive degradation.
Subfloor Flatness and Leveling Criteria
Resilient flooring requires a highly uniform surface. According to ASTM F710 standards, the subfloor must be flat to within 3/16 of an inch over a 10-foot radius (equivalent to 4.8 millimeters over a 3-meter span).
High Spot Mitigation: Concrete subfloor ridges, trowel marks, or old adhesive residues must be mechanically ground down using a diamond-cup grinding wheel. Manual chipping is insufficient for large-scale projects.
Low Spot Remediation: Depressions, joints, and cracks must be filled with a high-compressive-strength, Portland cement-based underlayment compound. Gypsum-based patching compounds are generally discouraged in heavy commercial settings due to their lower tensile strength.
Wood Subfloors: For timber-frame construction, the subfloor must consist of at least two layers of APA-rated underlayment-grade plywood, with a combined thickness of no less than 1 inch (25 millimeters). The boards must be fastened securely to eliminate joist deflection, which is a primary cause of tongue-and-groove failure.
Moisture Testing Protocol
Even though SPC and LVT are inherently waterproof, excess moisture emanating from a concrete slab can foster mold growth, compromise underlayment materials, or emulsify pressure-sensitive adhesives. Prior to executing the physical task of installing vinyl plank flooring, the substrate must undergo formal moisture testing as specified by engineering experts at TAB Flooring.
Two primary testing methodologies should be employed:
In-situ Relative Humidity Testing (ASTM F2170): This test utilizes electronic probes inserted into drilled holes within the concrete slab to measure internal humidity. For most standard click-lock floating floors, the relative humidity (RH) must not exceed 85%, unless a specialized high-performance vapor barrier is deployed.
Anhydrous Calcium Chloride Test (ASTM F1869): This test measures the vapor emission rate over a 1000-square-foot area over 24 hours. The maximum allowable moisture vapor emission rate (MVER) is typically 5 lbs per 1000 square feet per 24 hours.
If the testing reveals moisture levels exceeding these limits, a commercial-grade epoxy moisture mitigation coating must be applied to the slab prior to continuing the installation.
Environmental Conditioning and Material Acclimation
A common failure point in commercial construction schedules is the omission of the material conditioning phase. Resilient vinyl materials are thermoplastic, meaning they contract and expand in response to thermal fluctuations.
TAB Flooring recommends maintaining a consistent ambient environment for at least 48 hours before, during, and after the installation. The target room temperature must remain between 65°F and 85°F (18°C to 29°C), with a relative humidity range of 35% to 65%.
During the acclimation phase, the product cartons must be unboxed and stacked flat on the floor in neat piles, no more than five boxes high. Storing cartons vertically can cause the planks to bow, making the click-lock system difficult to engage during assembly. Crucially, the HVAC systems of the building must be operational and functioning under normal occupancy settings; temporary propane heaters must not be used, as they introduce high volumes of moisture into the indoor environment.
Step-by-Step Methodology for Installing Vinyl Plank Flooring
Once the subfloor meets all flatness and dryness criteria, and the material has stabilized to the ambient room temperature, the physical layout and assembly can proceed.
1. Layout Planning and Room Squaring
An aesthetic and structurally balanced layout prevents narrow, weak plank cuts at the perimeter of the room. The installer should measure the width of the room and divide it by the width of a single plank to calculate the width of the final row.
If the calculated width of the final row is less than 2 inches (50 millimeters), the starting row must be ripped down to balance the layout.
The length of the planks at the ends of rows must not be less than 8 inches (200 millimeters) to maintain structural stability.
This movement makes expansion joints highly necessary when installing vinyl plank flooring across spans exceeding 20 meters. A perimeter expansion gap of 1/4 inch (6 millimeters) must be maintained at all fixed vertical structures, including walls, columns, door frames, and pipes.
2. Installing the First Row
Begin the installation in the left-hand corner of the room with the tongue side of the plank facing the wall. Place spacers of the correct thickness against the wall to preserve the necessary expansion gap. As the first row is assembled, ensure the short end joints are aligned and fully locked according to the manufacturer's mechanical locking profile design.
3. Staggering Joint Patterns
To distribute physical loads and secure the locking mechanisms, plank end joints must be staggered from row to row by at least 8 inches (200 millimeters). A random stagger pattern is preferred over a repeating stair-step pattern, as it presents a more natural appearance and prevents structural weak lines across the floor.
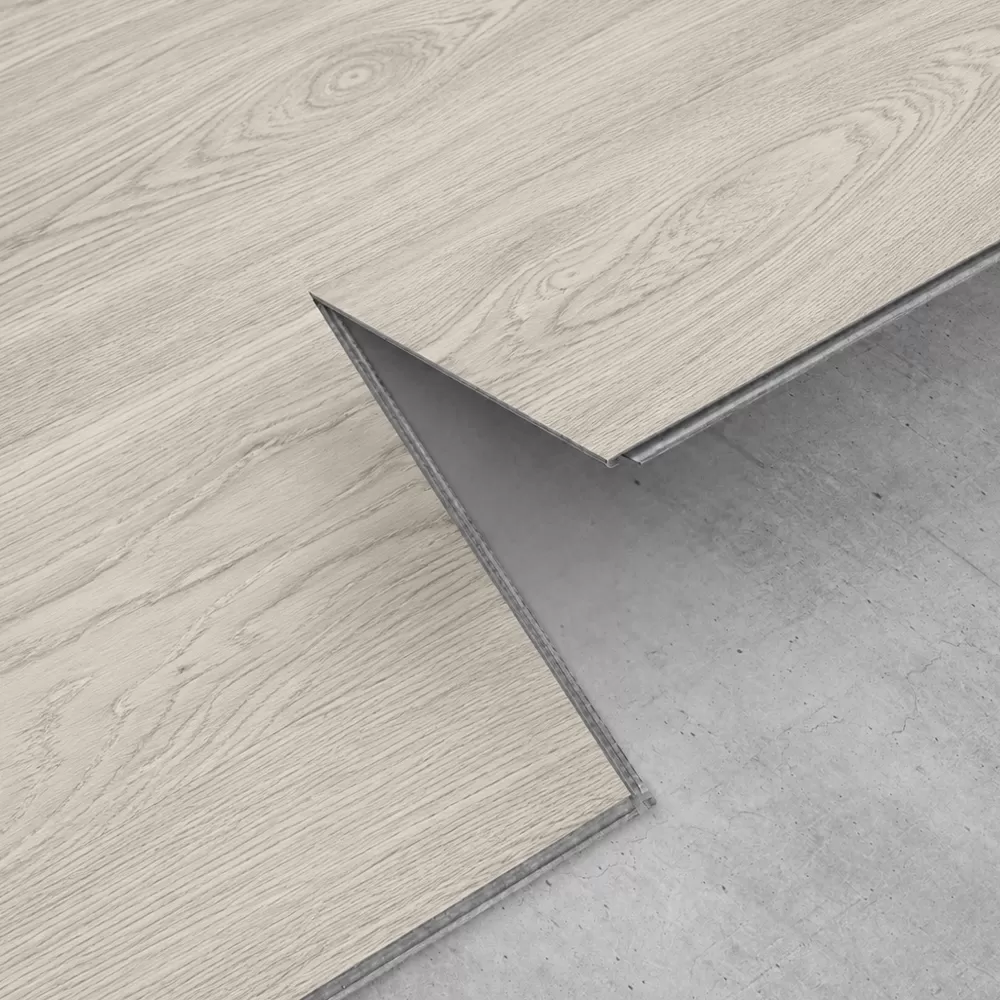
4. Engaging the Locking Mechanism
When installing vinyl plank flooring, ensuring correct joint alignment prevents micro-gaps. Insert the tongue of the long edge of the second row plank into the groove of the first row at an angle of approximately 15 to 20 degrees. Lower the plank while applying light forward pressure. To complete the engagement, use a non-marring tapping block and a dead-blown rubber mallet to gently tap the long edge first, followed by the short end joint. Direct hammer strikes on the tongue or groove of the vinyl plank will cause immediate fractures that compromise the joint's water resistance and tensile strength.
5. Doorway Transitions and Perimeter Finishing
Door casings should be undercut to allow the flooring to slide underneath them, ensuring the expansion gap remains hidden. In doorways or transitions between different rooms, T-moldings must be installed to isolate individual floor planes, allowing them to expand and contract independently without buckling.
Addressing Common Commercial Installation Challenges
Commercial projects present specific structural demands that are not typically encountered in residential settings. Addressing these issues early prevents long-term operational disruptions.
Transitioning to Other Floor Types: When joining vinyl planks with thicker materials like ceramic tile or commercial carpet, heavy-duty aluminum or brass transition profiles must be anchored to the subfloor rather than to the resilient planks. This preserves the floating nature of the vinyl system.
Heavy Static Loads: In environments with heavy static loads, such as retail shelving or medical equipment, a floating floor can become pinned to the substrate. This restricts natural thermal movement and causes bubbling in adjacent areas. In such scenarios, a full-spread glue-down dryback LVT system should be specified instead of a floating click-lock system.
Acoustic Underlayment Compatibility: If acoustic performance is mandated by local building codes, ensure that any separate underlayment pad has a high compressive strength (minimum 40 psi) and does not exceed 1.5 millimeters to 2 millimeters in thickness. Excessive cushion underlayment can cause too much vertical deflection under foot traffic, resulting in the shear failure of the locking joints.
Quality Assurance Checklist for Project Managers
Before handing over a completed project, a systematic inspection should be conducted to verify compliance with industry standards. The following parameters must be verified:
| Inspection Focus | Required Specification | Method of Verification |
|---|---|---|
| Expansion Gaps | Minimum 1/4 inch (6mm) at all vertical obstructions | Visual inspection and depth gauge measurement |
| Joint Alignment | Zero visible lippage, gaps < 0.15mm | Straightedge and feeler gauge inspection |
| Plank Staggering | Minimum 8-inch (200mm) spacing between end joints | Visual count and tape measure check |
| Subfloor Deflection | No vertical movement under heavy rolling loads | Rolling load testing using standard service equipment |
| Transition Trims | Securely fastened to substrate, not pinching the planks | Manual structural check |
Frequently Asked Questions
Q1: What are the primary causes of joint separation after installing vinyl plank flooring?
A1: Joint separation is primarily caused by structural subfloor unevenness, inadequate acclimation of the material before installation, or a lack of proper perimeter expansion gaps. When the flooring expands against a wall without a gap, the resulting tension forces the joints to buckle or shear apart under load.
Q2: Can we install heavy cabinets and commercial fixtures directly on top of floating vinyl planks?
A2: No, heavy cabinetry, retail counters, or heavy machinery must not be installed directly on top of floating vinyl planks. These heavy loads pin the floor to the subfloor, preventing the necessary expansion and contraction. The correct procedure is to install the cabinets first, then install the flooring around them, maintaining the standard expansion gap beneath the kickplates.
Q3: Is a separate vapor barrier necessary when installing over a concrete slab?
A3: Yes, even if the vinyl planks are waterproof, a minimum 6-mil polyethylene moisture barrier is highly recommended on all concrete subfloors. This barrier prevents moisture vapor from rising through the slab and creating hydrostatic pressure, which can lead to mold development or joint contamination.
Q4: How soon can heavy rolling loads and foot traffic be permitted on the new floor?
A4: For floating click-lock installations, light foot traffic is acceptable immediately after installation is complete. For glue-down installations, foot traffic should be restricted for 24 hours, and heavy rolling loads or furniture placement should be delayed for at least 48 to 72 hours to allow the adhesive to achieve a complete cure.
Q5: How do temperature fluctuations in commercial spaces affect the flooring system?
A5: Large temperature shifts cause thermoplastic vinyl to swell in hot weather and shrink in cold weather. If the HVAC system is shut down during seasonal transitions or weekends, the planks will move. Proper expansion gaps, T-moldings in large areas, and choosing a highly rigid SPC core rather than a standard flexible LVT help minimize this dimensional variance.
Commercial Flooring Specification and Consultation
Selecting the correct material specification and structural format is vital to ensuring the longevity of high-traffic commercial environments. As an international supplier of rigid core products, TAB Flooring provides comprehensive specification support, tailored product development, and wholesale custom supply options to meet the strict demands of architectural projects worldwide.
For detailed structural specifications, material safety datasheets, or a custom quote for your upcoming project, please submit an inquiry to our commercial sales division. Our team of product specialists is available to assist you with subfloor analysis, acoustic testing data, and comprehensive project support.